Mastering Spark on K8s 🔥 and Why I Dumped 💔 Kubeflow Spark Operator (Formerly Google's Spark Operator)!
Heyoooo Spark ⚡ developers! My product manager several months ago asked me one question: "Is it possible to run Spark applications without K8s 🐳 cluster-level access?" At the time, I only knew the Kubeflow 🔧 Spark Operator well and was using it for deploying all my Spark applications. For those who know, you must have K8s cluster-level access to use the Kubeflow Spark Operator. The reasons are because it installs CRDs and ClusterRole. So I told him "no" with these reasons, and on his side, he tried his best to convince the prospect with the constraint in mind. At the enterprise level, they usually have a multi-tenant K8s cluster segregated by company/department, project, and environment (dev, uat, pre-prod, or prod) using Namespaces. This way, they make the most of the computing resources allocated. Plus, if one project does not meet the expectation or the contract ends, hop hop kubectl delete <compordept>-<project>-<env> and it's like the project has never existed. I am currently writing to tell my product manager, "Yes, it's possible to run Spark applications without K8s cluster-level access."! Here is how! 🚀
🤔 K8s, Spark and Kubeflow?
What are K8s, Spark, and Kubeflow Spark Operator? Quickly:
- 🐳 K8s: Kubernetes (K8s) is an open-source container orchestration platform designed to automate the deployment, scaling, and management of containerized applications, often used to orchestrate complex frameworks like Apache Spark for efficient data processing at scale.
- ⚡ Spark: Apache Spark is an open-source distributed computing framework that enables fast data processing and analytics, widely recognized and supported by the company Databricks in big data environments.
- 🔧 Kubeflow Spark Operator: The Kubeflow Spark Operator facilitates seamless integration of Apache Spark with Kubernetes. Originally developed by Google Cloud Platform, it has recently been donated to the Kubeflow community.
At the end of this guide, you should also be able to launch a Spark application on a Kubernetes cluster and understand when to use basic Spark CLI or the Kubeflow Spark Operator. Let's get started!
👨💻 Local K8s for development
In this part, we are going to install a one-node K8s locally and simulate an enterprise K8s segregated by namespaces.
The goal is to set up the prerequisites for when we are going to launch Spark applications.
Installation
In the past, there was minikube for local K8s development. But now, Docker Desktop has integrated Kubernetes directly 🤩! So let's install Docker Desktop.
Then you just need to launch the executable and follow the instructions. Once you have successfully installed Docker Desktop, to have your single-node K8s cluster:
- Go to
Settings (top-right) > Kubernetes - Check the box
Enable Kubernetes - Click on
Apply & restart> Click onInstall - It should start pulling necessary Docker images
After a while, you should see the screen with the little Kubernetes running on the bottom left. You can validate your installation by opening a terminal, then the following command.
It should return an output similar to this:
Nice! 🎉 You've successfully installed Kubernetes.
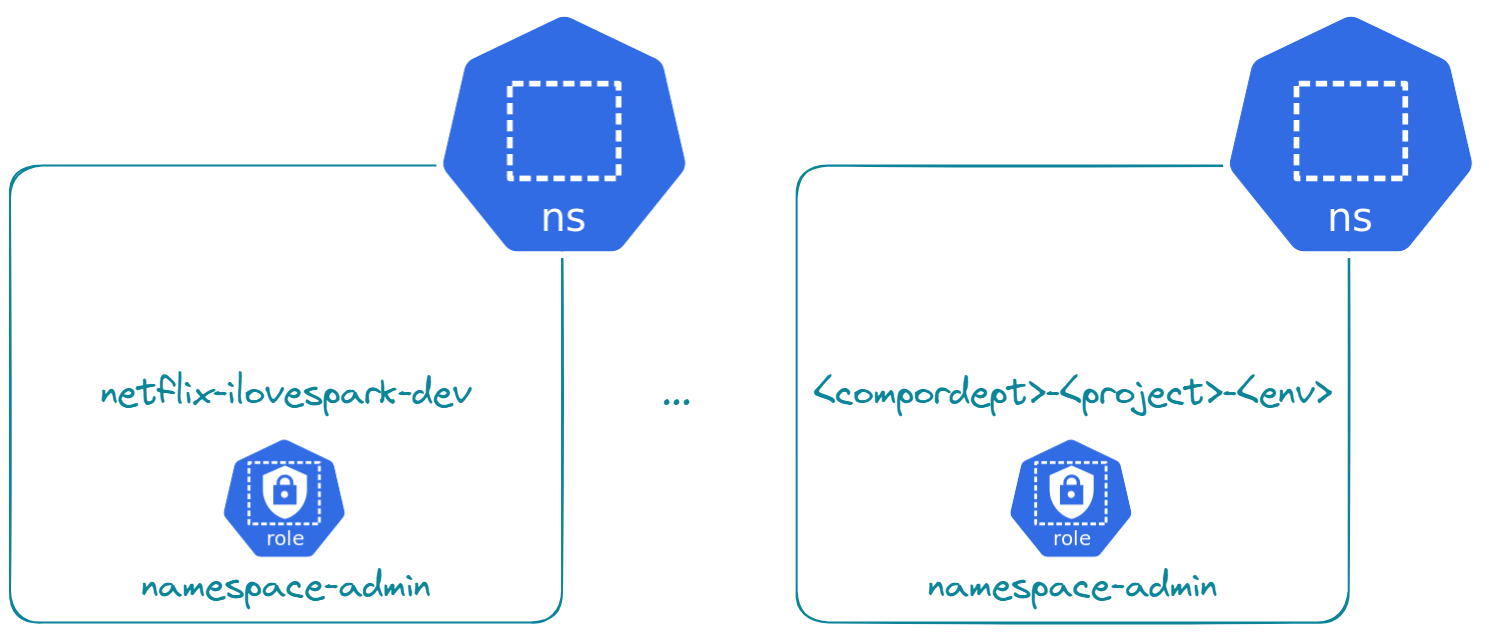
Isolated namespace
The goal now is to set up isolated namespaces to simulate an enterprise multi-tenant Kubernetes cluster. To set up an isolated namespace, here are the essentials:
- 📦🌐 A namespace under quota: Kubernetes resources are not unlimited. The relevant resources to limit are CPU, RAM, ephemeral storage, number of pods, and other resources as necessary.
- 👩💻🌐 An admin namespace role: Users must be restricted to a namespace, but within this namespace, Kubernetes admins should provide all necessary access for them to operate autonomously. However, they should not have permission to create, update, or delete quotas and roles.
- 🔄🌐 Expirable access: Projects do not last indefinitely, so access should not be permanent either.
Let's get to work!
First, the namespace under quota:
kubectl create ns compordept-project-env # Create the namespace.
kubectl config set-context docker-desktop --namespace=compordept-project-env # Switch to the namespace.
echo '
---
apiVersion: v1
kind: ResourceQuota
metadata:
  name: namespace-quota
spec:
  hard:
    limits.memory: "1939Mi"
    requests.cpu: "3"
    requests.memory: "1939Mi"
    persistentvolumeclaims: "9"
    requests.ephemeral-storage: "227Gi"
    limits.ephemeral-storage: "227Gi"
    pods: "27"
    services: "9"
' | kubectl apply -f -
Second, the admin namespace role:
echo '
# This script lists all namespaced resources and sub-resources except "resourcequotas" and "role". The goal is to have them in a final YAML array which we can pipe to the kubectl command.

import subprocess, json
kubectl_get_raw_as_dict = lambda path: json.loads(subprocess.check_output(f"kubectl get --raw {path}", shell=True, text=True, stderr=subprocess.PIPE))
print_as_yaml_array = lambda list_of_strings: print(json.dumps(list_of_strings))

paths = kubectl_get_raw_as_dict("/")["paths"]
output_resources = []
for path in paths:
  try:
    resources = kubectl_get_raw_as_dict(path)["resources"]
    resources = [resource["name"] for resource in resources if resource["namespaced"] == True and (resource["name"] not in ["resourcequotas", "roles"])]
    output_resources.extend(resources)
  except:
    pass
print_as_yaml_array(output_resources) # Print to the console for piping.
' | python3 | xargs -I {} echo '
---
apiVersion: rbac.authorization.k8s.io/v1
kind: Role
metadata:
  name: namespace-admin
rules:
  - apiGroups: ["*"]
    resources: {} # Piped here!
    verbs: ["*"]
  - apiGroups: ["*"]
    resources: ["resourcequotas"]
    verbs: ["get", "list", "watch"]
  - apiGroups: ["*"]
    resources: ["roles"]
    verbs: ["get", "list", "watch"]

---
apiVersion: rbac.authorization.k8s.io/v1
kind: RoleBinding
metadata:
  name: namespace-admin
subjects:
  - kind: Group
    name: namespace-admin
    apiGroup: rbac.authorization.k8s.io
roleRef:
  kind: Role
  name: namespace-admin
  apiGroup: rbac.authorization.k8s.io
' | kubectl apply -f -
Info
The command kubectl api-resources --namespaced=true unfortunately does not list the sub-resources for those who thought about it. This means if this command is used as a base, the sub-resource pods/log won't be set for our namespace-admin.
Third, the expirable access:
# Generate CSR (on user side)
openssl genrsa -out compordept-project-env-admin.key 2048
openssl req -new -key compordept-project-env-admin.key -out compordept-project-env-admin.csr -subj "/CN=namespace-admin/O=namespace-admin"

# Validate CSR & Generate CRT (on K8S admin side)
cat compordept-project-env-admin.csr | base64 | tr -d "\n" | xargs -I {} echo '
---
apiVersion: certificates.k8s.io/v1
kind: CertificateSigningRequest
metadata:
  name: compordept-project-env-admin
spec:
  request: {}
  signerName: kubernetes.io/kube-apiserver-client
  expirationSeconds: 7898368 # 3 months
  usages:
    - client auth
' | kubectl apply -f -
kubectl certificate approve compordept-project-env-admin
kubectl get csr compordept-project-env-admin -o jsonpath='{.status.certificate}'| base64 -d > compordept-project-env-admin.crt # Certificate to give to your user

# Set CRT and use created user (on user side)
kubectl config set-credentials compordept-project-env-admin --client-key=compordept-project-env-admin.key --client-certificate=compordept-project-env-admin.crt --embed-certs=true
kubectl config set-context docker-desktop --user=compordept-project-env-admin
rm compordept-project-env-admin.* # Purge certificates from disk
Warning
As you can see by the comments, creating the namespace-admin user involves the K8s admin and the requester in a perfect world. But, for simplicity, the K8s admin can also just run all the commands and provide the final compordept-project-env-admin.key and compordept-project-env-admin.crt.
If you've reached this point, you should be set in the namespace compordept-project-env-admin as the user namespace-admin! The following command should list you the namespace-admin role.
This role can be viewed using:
Name:         namespace-admin
Labels:       <none>
Annotations:  <none>
PolicyRule:
  Resources                          Non-Resource URLs  Resource Names  Verbs
  ---------                          -----------------  --------------  -----
  bindings.*                         []                 []              [*]
  configmaps.*                       []                 []              [*]
  controllerrevisions.*              []                 []              [*]
  cronjobs.*/status                  []                 []              [*]
  cronjobs.*                         []                 []              [*]
  csistoragecapacities.*             []                 []              [*]
  daemonsets.*/status                []                 []              [*]
  daemonsets.*                       []                 []              [*]
  deployments.*/scale                []                 []              [*]
  deployments.*/status               []                 []              [*]
  deployments.*                      []                 []              [*]
  endpoints.*                        []                 []              [*]
  endpointslices.*                   []                 []              [*]
  events.*                           []                 []              [*]
  horizontalpodautoscalers.*/status  []                 []              [*]
  horizontalpodautoscalers.*         []                 []              [*]
  ingresses.*/status                 []                 []              [*]
  ingresses.*                        []                 []              [*]
  jobs.*/status                      []                 []              [*]
  jobs.*                             []                 []              [*]
  leases.*                           []                 []              [*]
  limitranges.*                      []                 []              [*]
  localsubjectaccessreviews.*        []                 []              [*]
  networkpolicies.*                  []                 []              [*]
  persistentvolumeclaims.*/status    []                 []              [*]
  persistentvolumeclaims.*           []                 []              [*]
  poddisruptionbudgets.*/status      []                 []              [*]
  poddisruptionbudgets.*             []                 []              [*]
  pods.*/attach                      []                 []              [*]
  pods.*/binding                     []                 []              [*]
  pods.*/ephemeralcontainers         []                 []              [*]
  pods.*/eviction                    []                 []              [*]
  pods.*/exec                        []                 []              [*]
  pods.*/log                         []                 []              [*]
  pods.*/portforward                 []                 []              [*]
  pods.*/proxy                       []                 []              [*]
  pods.*/status                      []                 []              [*]
  pods.*                             []                 []              [*]
  podtemplates.*                     []                 []              [*]
  replicasets.*/scale                []                 []              [*]
  replicasets.*/status               []                 []              [*]
  replicasets.*                      []                 []              [*]
  replicationcontrollers.*/scale     []                 []              [*]
  replicationcontrollers.*/status    []                 []              [*]
  replicationcontrollers.*           []                 []              [*]
  resourcequotas.*/status            []                 []              [*]
  rolebindings.*                     []                 []              [*]
  secrets.*                          []                 []              [*]
  serviceaccounts.*/token            []                 []              [*]
  serviceaccounts.*                  []                 []              [*]
  services.*/proxy                   []                 []              [*]
  services.*/status                  []                 []              [*]
  services.*                         []                 []              [*]
  statefulsets.*/scale               []                 []              [*]
  statefulsets.*/status              []                 []              [*]
  statefulsets.*                     []                 []              [*]
  resourcequotas.*                   []                 []              [get list watch]
  roles.*                            []                 []              [get list watch]
This command should give you a "forbidden access" error.
If your manager or you feel unhappy with the project, you can purge the namespace and the authorized certificate 💔 just with the following commands.
kubectl config set-context docker-desktop --user=docker-desktop # Set back to the K8s admin user
kubectl config set-context docker-desktop --namespace=default # Set back to the default namespace
kubectl delete csr compordept-project-env-admin
kubectl delete ns compordept-project-env
Congratulations! 🎉 You know how to set up and manage a multi-tenant K8s cluster organized by namespaces!
💻 Spark on K8s via CLI
In this part, we are going to install Spark and launch spark-submit directly on the previously set up K8s namespace!
Let's get to work!
Installation
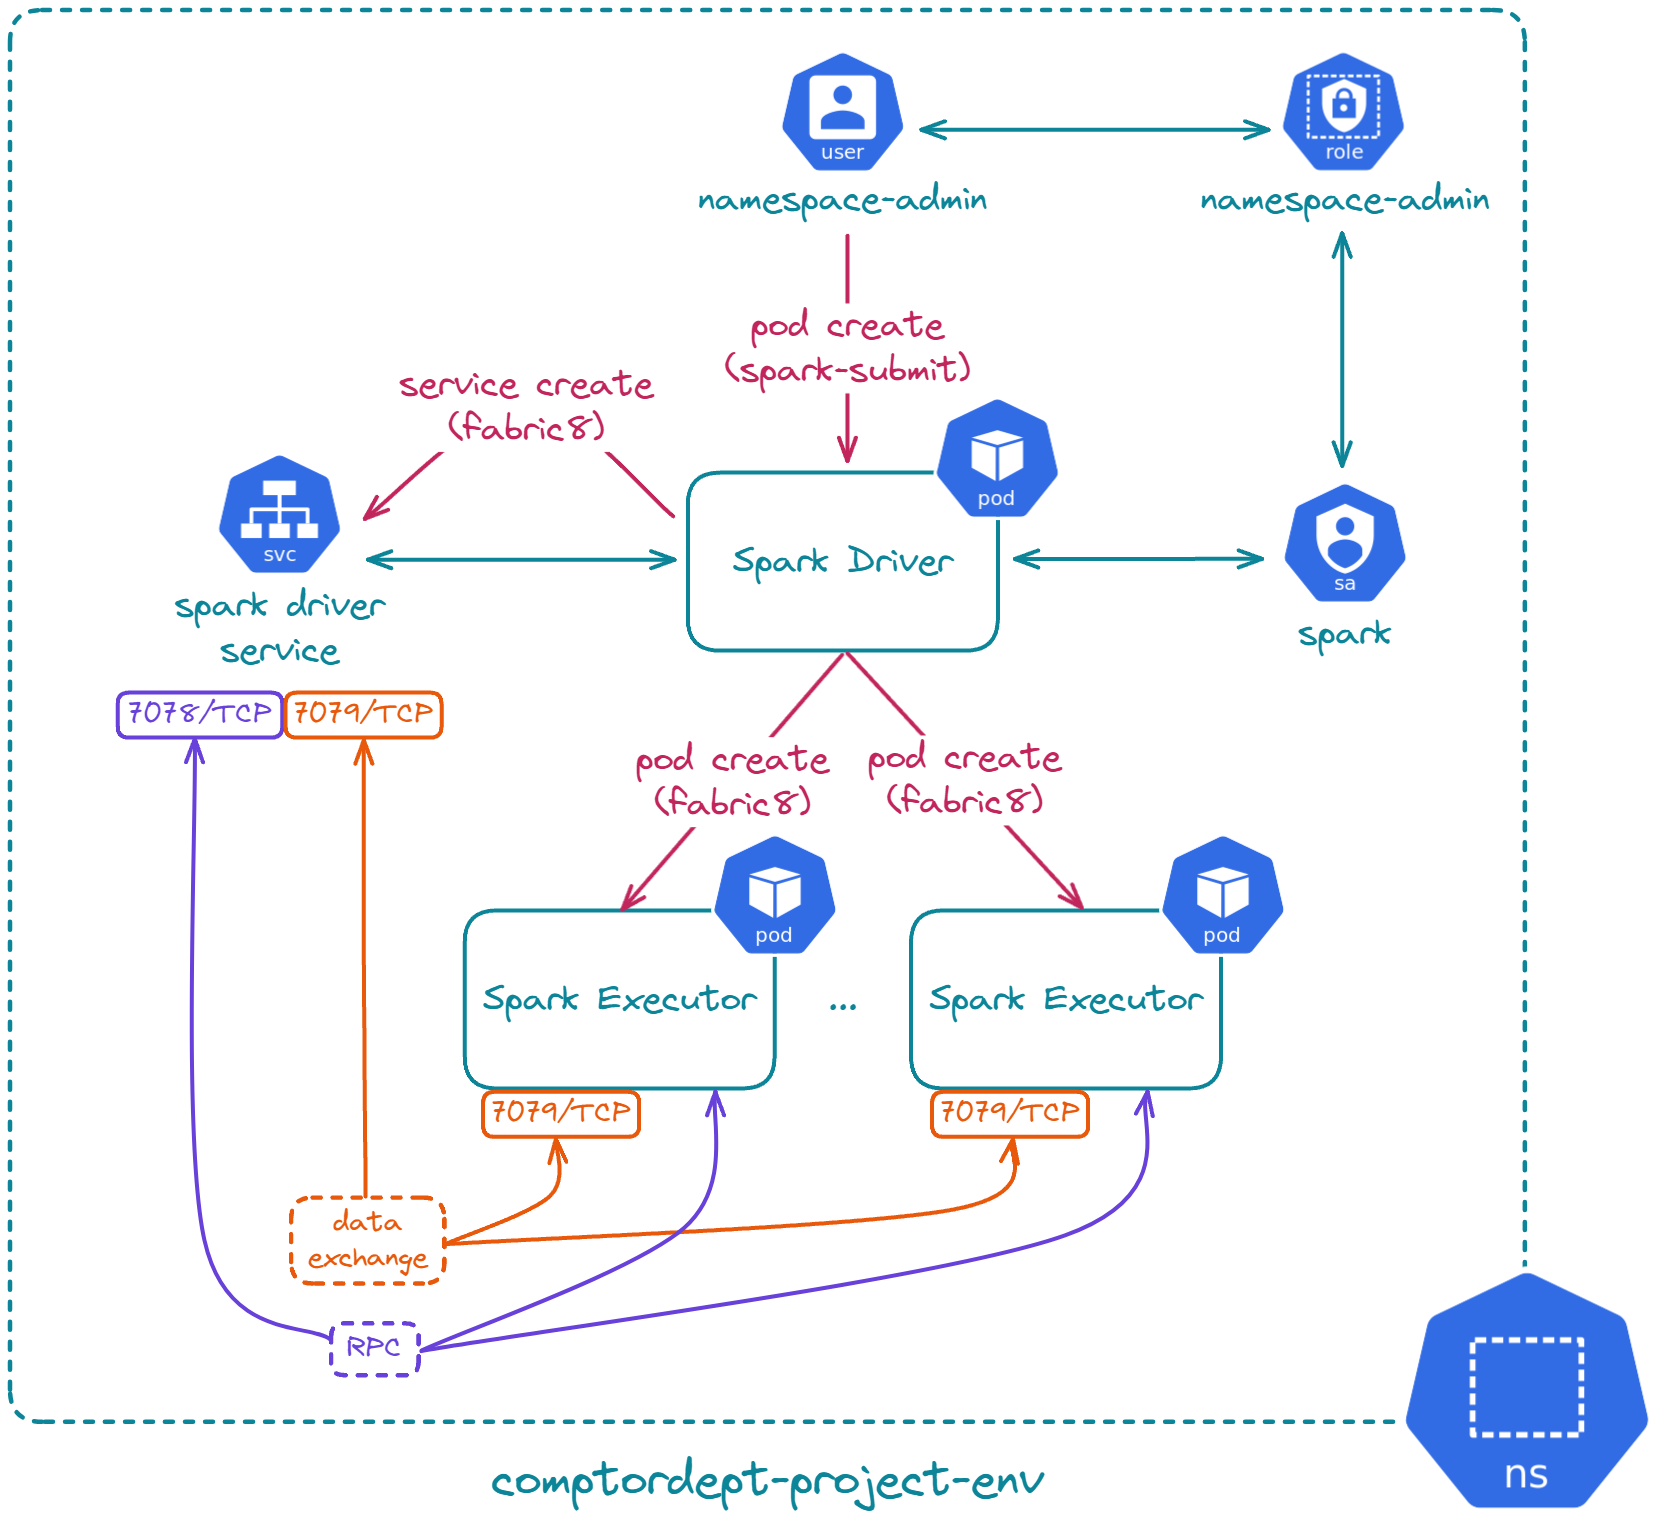
Three prerequisites are needed to be able to launch Spark on K8s using the spark-submit command.
- 🗝️ K8s credentials setup on the machine: Already done previously 😇!
- ⚡ Spark installed on the machine executing the command
- 🔧 A dedicated K8s service account for the Spark driver pod: This is necessary because it's the Spark driver pod who creates Spark executors and monitors them, manages necessary services, manages necessary configmaps and claims or releases volumes.
To install Spark, here are the two necessary commands.
curl -fL "https://github.com/coursier/launchers/raw/master/cs-x86_64-pc-linux.gz" | gzip -d > cs
chmod +x cs
./cs setup -y --jvm 17
rm cs
source ~/.profile
java --version
- Install Spark
mkdir -p ~/apps/spark
curl -fLo ~/apps/spark/spark-3.5.1-bin-hadoop3-scala2.13.tgz https://dlcdn.apache.org/spark/spark-3.5.1/spark-3.5.1-bin-hadoop3-scala2.13.tgz
tar -xf ~/apps/spark/spark-3.5.1-bin-hadoop3-scala2.13.tgz -C ~/apps/spark
rm ~/apps/spark/spark-3.5.1-bin-hadoop3-scala2.13.tgz
echo -e '\nexport PATH="~/apps/spark/spark-3.5.1-bin-hadoop3-scala2.13/bin:$PATH"' >> ~/.bashrc
source ~/.bashrc
spark-submit --version
Then you can install the Spark service account bound to namespace-admin role. This part assumes the isolated namespace is properly set up.
echo '
---
apiVersion: v1
kind: ServiceAccount
metadata:
  name: spark

---
apiVersion: rbac.authorization.k8s.io/v1
kind: RoleBinding
metadata:
  name: spark
subjects:
  - kind: ServiceAccount
    name: spark
roleRef:
  kind: Role
  name: namespace-admin
  apiGroup: rbac.authorization.k8s.io
' | kubectl apply -f -
You can list service accounts to check if Spark's is correctly installed or not.
You can delete the service account with the following command.
Let's go to the next part! Submitting a Spark job! 😃
Submitting a Spark job
The goal is to use the provided Spark application with the installation: "SparkPi". By default, when building your own Spark application, you should build a custom Docker image following the official guide. It is also possible to use the Spark official Docker image on DockerHub as a base to inject your custom Spark application JAR. In our case, the Spark official Docker image already includes the "SparkPi" application at '/opt/spark/examples/jars/spark-examples_2.12-3.5.1.jar', so we are going to use that directly.
This part is going to be short because all the prerequisites are already done. It's now just a matter of launching the following command 😎.
spark-submit --master k8s://https://kubernetes.docker.internal:6443 --deploy-mode cluster --name spark-app --class org.apache.spark.examples.SparkPi --conf spark.kubernetes.driver.request.cores=50m --conf spark.kubernetes.executor.request.cores=200m --conf spark.driver.memory=512m --conf spark.executor.memory=512m --conf spark.executor.instances=1 --conf spark.kubernetes.container.image=spark:3.5.1-scala2.12-java17-ubuntu --conf spark.kubernetes.namespace=compordept-project-env --conf spark.kubernetes.authenticate.driver.serviceAccountName=spark local:///opt/spark/examples/jars/spark-examples_2.12-3.5.1.jar 1
You can open a second terminal to watch the Spark pods in action héhé 🤩.
If you take a look at the driver pod logs, you should see the Pi estimate.
The command to kill Spark driver pods if necessary.
spark-submit --kill compordept-project-env:spark-app* --master k8s://https://kubernetes.docker.internal:6443
Congratulations! You are now capable of running Spark on K8s and all without K8s cluster-level access, just namespace-level access is enough 👍! It also means it's extremely easy to uninstall the project from the K8s cluster, just a matter of kubectl delete ns compordept-project-env 😉. But, it requires installing Spark on the machine executing the command as you can see.
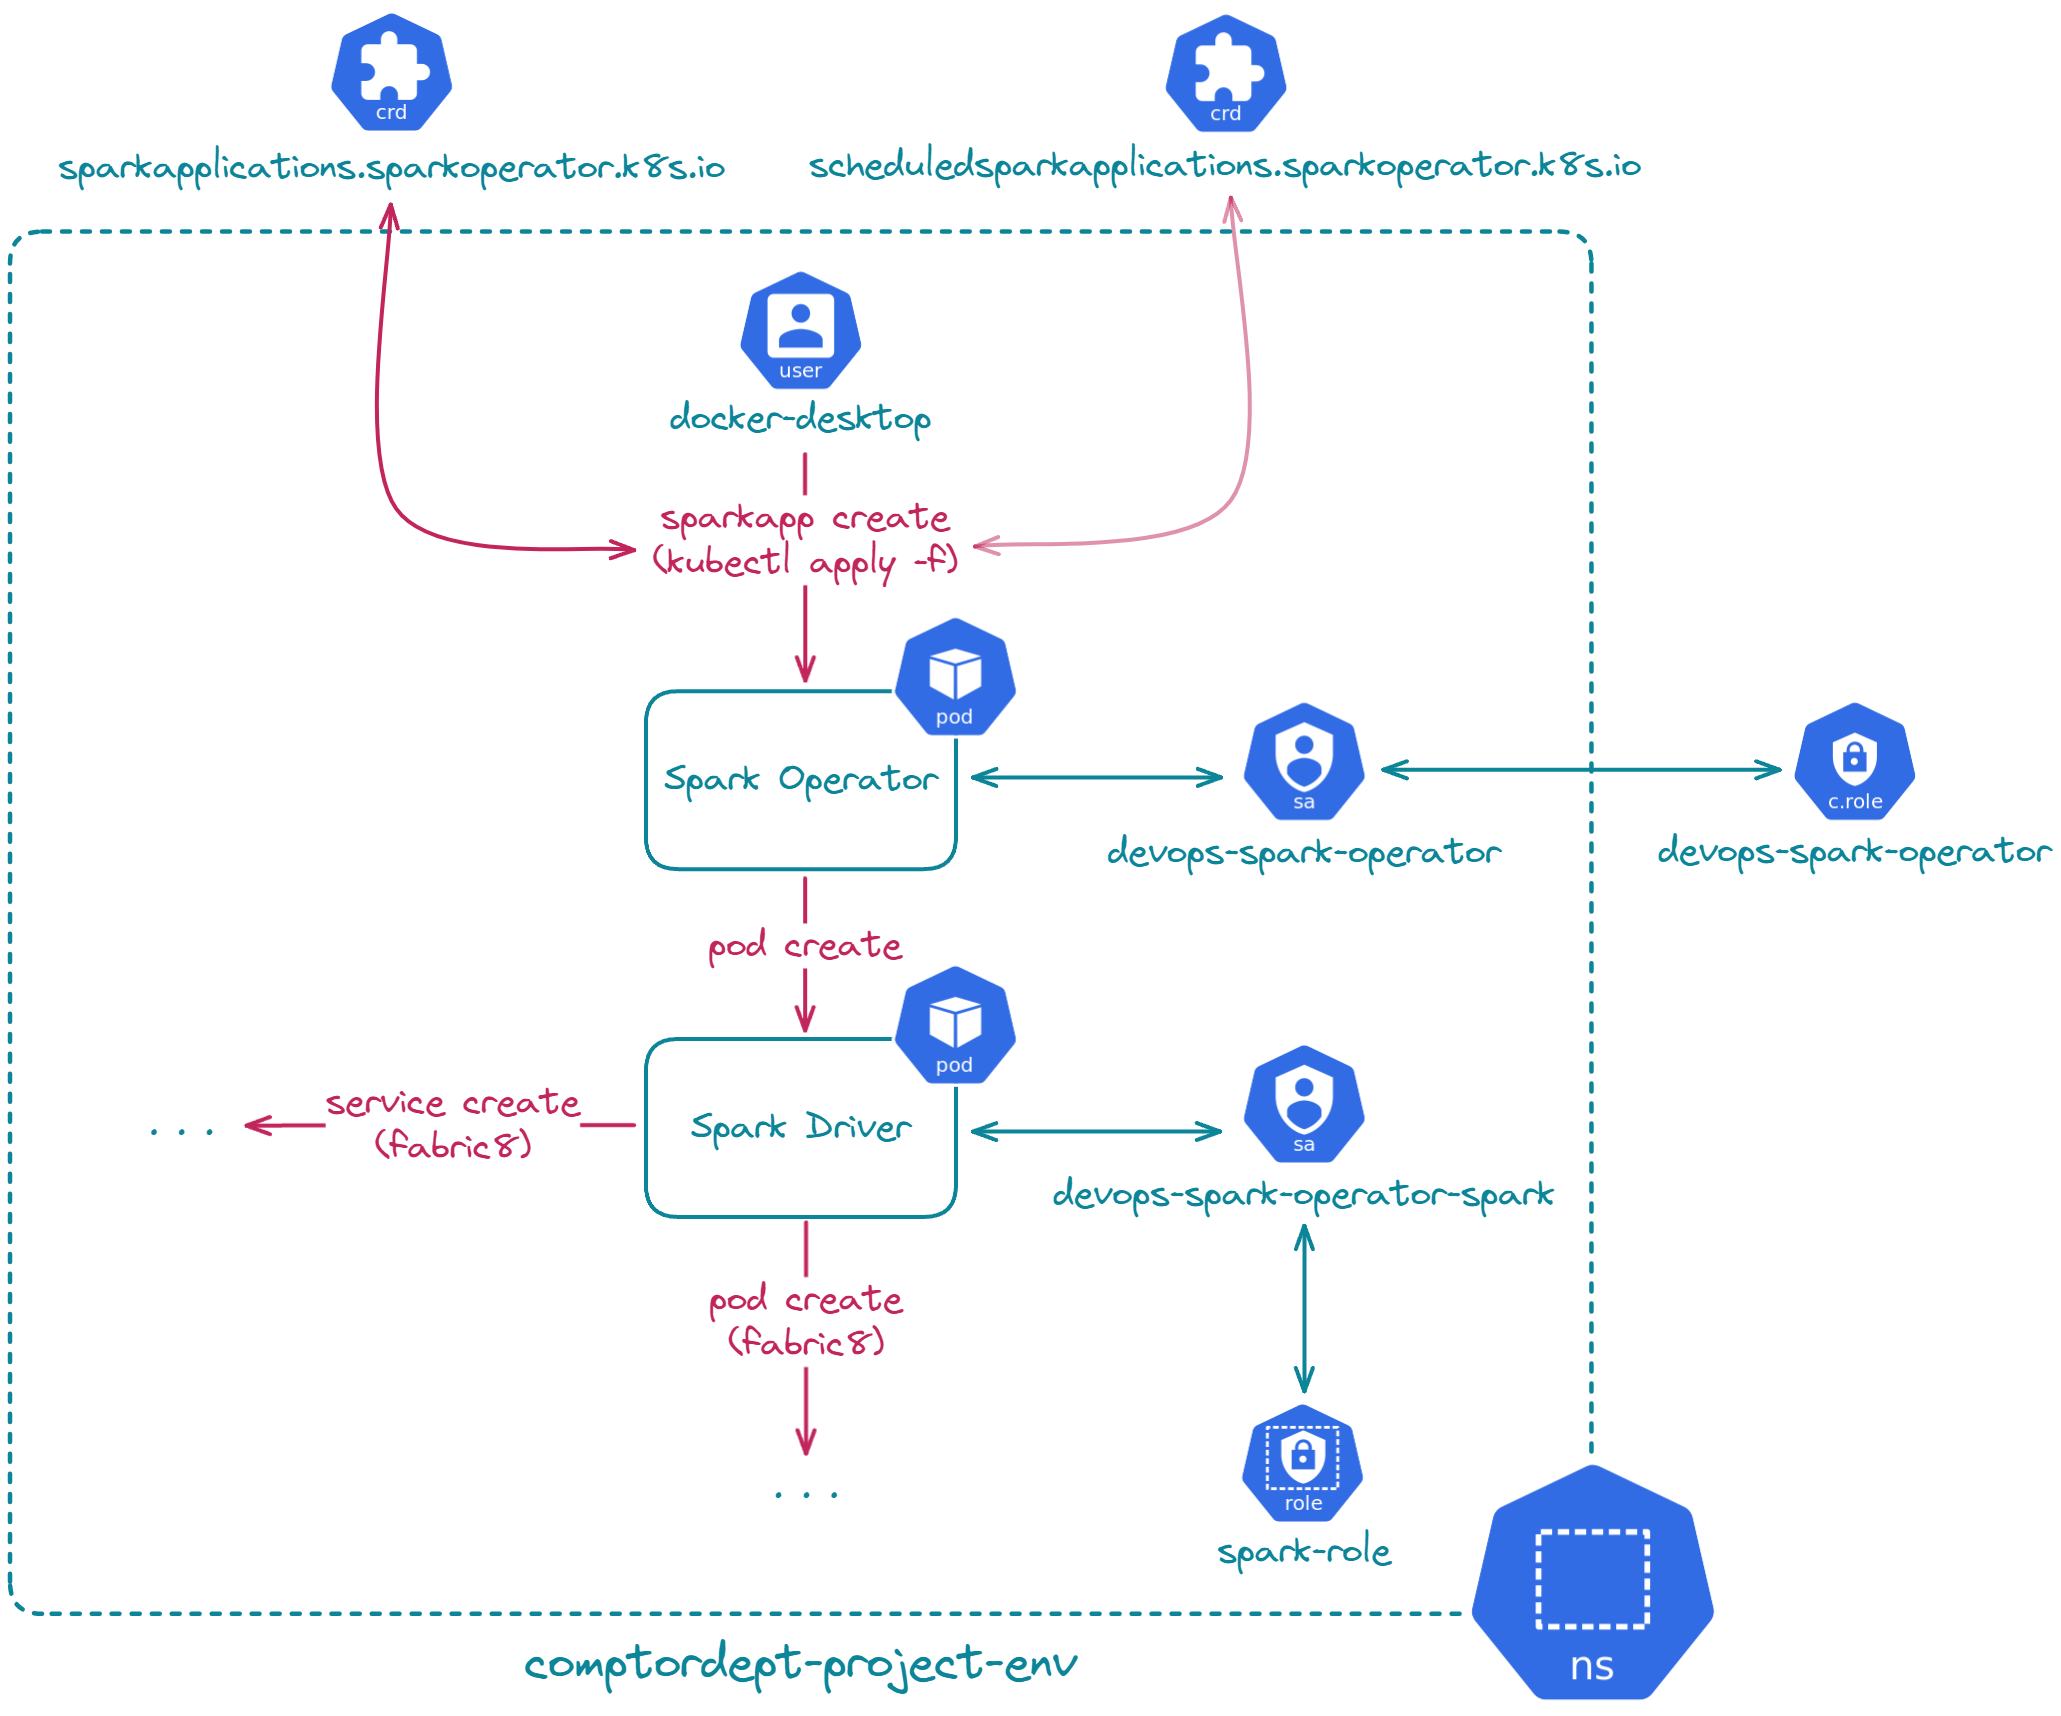
🔧 Spark on K8s via Kubeflow
First, let's clean up some leftovers from the previous part.
spark-submit --kill compordept-project-env:spark-app* --master k8s://https://kubernetes.docker.internal:6443
kubectl delete rolebinding spark
kubectl delete sa spark
In this part, we are going to show that the Kubeflow Spark operator is not compatible with our previously set-up isolated namespace. Then, we will revert to cluster-level access, install the Kubeflow Spark operator, and launch the same 'SparkPi' application.
Let's go!
Installation
Here are the steps to install Kubeflow Spark operator:
- ⬇️🛠️ Install Helm: Kubeflow Spark operator is available via a Helm chart, which is why the Helm CLI is necessary.
- 🔑🌐 Ensure you have necessary Kubernetes cluster-level access: Kubeflow Spark operator installs CRDs and ClusterRoles, which require cluster-level access.
- 🔧🌐 Add the Kubeflow Spark operator repository locally and install it on the Kubernetes cluster
Let's make Kubeflow Spark operator work!
Here is the command to install Helm.
curl -fsSL -o get_helm.sh https://raw.githubusercontent.com/helm/helm/main/scripts/get-helm-3
chmod 700 get_helm.sh
./get_helm.sh
rm ./get_helm.sh
You can confirm the installation with the following command:
version.BuildInfo{Version:"v3.15.1", GitCommit:"e211f2aa62992bd72586b395de50979e31231829", GitTreeState:"clean", GoVersion:"go1.22.3"}
If it worked, Helm is perfectly installed 😁!
Next, we have the necessary Kubernetes cluster-level access, but let's skip this part for now. Remember, we are currently set with namespace-level access using the namespace-admin role. So, let's try installing the Kubeflow Spark operator without cluster-level access.
helm repo add spark-operator https://kubeflow.github.io/spark-operator
helm install devops-spark-operator spark-operator/spark-operator --version 1.4.0 -n compordept-project-env
You should receive the following 'Forbidden' access error.
Error: INSTALLATION FAILED: failed to install CRD crds/sparkoperator.k8s.io_scheduledsparkapplications.yaml: 1 error occurred:
        * customresourcedefinitions.apiextensions.k8s.io is forbidden: User "namespace-admin" cannot create resource "customresourcedefinitions" in API group "apiextensions.k8s.io" at the cluster scope
As you can see, it's not possible to use Spark via Kubeflow Spark Operator without Kubernetes cluster-level access! Let's switch back to our Kubernetes admin user.
kubectl config set-context docker-desktop --user=docker-desktop # Set back to the K8s admin user
kubectl config delete-user compordept-project-env-admin
kubectl delete rolebinding namespace-admin
kubectl delete role namespace-admin
kubectl delete csr compordept-project-env-admin
Now let's try again.
helm install devops-spark-operator spark-operator/spark-operator --version 1.4.0 -n compordept-project-env
NAME: devops-spark-operator
LAST DEPLOYED: Fri Jun 21 07:48:49 2024
NAMESPACE: compordept-project-env
STATUS: deployed
REVISION: 1
TEST SUITE: None
Ok, it seems it has worked now. But if you look at the pods, the Kubeflow Spark operator pod is missing.
This is due to the ResourceQuota in place, which requires requests and limits to be set up on all pods in order to orchestrate them. I did not find a way to configure them during Helm chart installation. So let's just remove the quota:
Then, try to reinstall the chart.
helm uninstall devops-spark-operator -n compordept-project-env
helm install devops-spark-operator spark-operator/spark-operator --version 1.4.0 -n compordept-project-env
Then, list the pods.
Wow, this time it actually worked 👍! Installation complete!
Here are some commands if you would like to delete the created resources.
helm uninstall devops-spark-operator -n compordept-project-env
kubectl delete crds scheduledsparkapplications.sparkoperator.k8s.io sparkapplications.sparkoperator.k8s.io
Let's proceed to submitting Spark applications now.
Submitting a Spark job
To launch a Spark job, here are the steps:
- 📄⚙️ Define a K8s manifest YAML file using the resource
SparkApplication. This resource is not native to K8s; it comes from the Kubeflow Spark Operator CRDs. - 📄🚀 Then, just apply the K8s file.
Let's use the official Spark Docker image that comes with the "SparkPi" application, like when we were running Spark via CLI.
echo "
apiVersion: "sparkoperator.k8s.io/v1beta2"
kind: SparkApplication
metadata:
  name: spark-app
spec:
  type: Scala
  mode: cluster
  image: "spark:3.5.1"
  imagePullPolicy: Always
  mainClass: org.apache.spark.examples.SparkPi
  mainApplicationFile: "local:///opt/spark/examples/jars/spark-examples_2.12-3.5.1.jar"
  sparkVersion: "3.5.1"
  restartPolicy:
    type: Never
  driver:
    cores: 1
    memory: "512m"
    labels:
      version: 3.5.1
    serviceAccount: devops-spark-operator-spark
  executor:
    cores: 1
    instances: 1
    memory: "512m"
    labels:
      version: 3.5.1
" | kubectl apply -f -
If you pay attention, in terms of driver and executor core requests, it's not exactly the same as the previous Spark submit via Spark CLI. Previously, '50m' and '200m' were set. This is because the SparkApplication resource does not support millicore units.
The SparkApplication resource, like any other K8s resource, can be listed.
If you list the pods, you will see your Spark application running!
NAME                                     READY   STATUS              RESTARTS      AGE
devops-spark-operator-76968c6d75-nn4l7   1/1     Running             2 (57m ago)   25h
spark-app-driver                         1/1     Running             0             35s
spark-pi-5672d5903ed86ce8-exec-1         0/1     ContainerCreating   0             1s
And you can get your estimated Pi just like for the Spark via CLI.
The following command deletes SparkApplication resources and their related pods.
Congratulations! You know how to launch a Spark job using the Kubeflow Spark operator! The advantage of using the Kubeflow Spark operator instead of the default Spark via CLI is not needing to set up Spark locally or install Java and Spark. Plus, the Kubeflow Spark operator offers other features like cron scheduling and the sparkctl command-line tool.
🔚 Conclusion
I think you don't need the Kubeflow Spark operator. The basic Spark via CLI for running jobs on Kubernetes is best, even if you have cluster-level access to install the Kubeflow Spark operator. This way, it enforces data engineers to work with tight namespace-level access on K8s, which is often the case in the industry.
I write monthly on the LovinData Blog and on Medium, and like to give back the knowledge I've learned. So don't hesitate to reach out; I'm always available to chat about nerdy stuff 🤗! Here are my socials: LinkedIn, Twitter and Reddit. Otherwise, let's learn together in the next story 🫡! Bye ❤️.